- Quickstarts
- Shopify
Deploy a Shopify App
You can deploy a custom Shopify app to Render to extend Shopify’s core capabilities for Shopify store owners. A Shopify app might add features to an existing Shopify store, introduce new admin functionality, or pull in Shopify merchant data for processing and analysis.
Getting started
You can clone our example repository if you already have your Shopify API and secret values, and you know which scopes you want to use. Otherwise, follow the steps below to create a new Shopify app and deploy it to Render.
Create your project with the Shopify CLI
Following the steps in Shopify’s App tutorial, let’s create a new app from your terminal using the Shopify CLI. Note that the steps differ slightly depending on whether you’re building an “app” or an “extension”, so make sure to create the right project for your use case. The process to deploy to Render is similar in either case.
Before you begin these steps, make sure you have recent versions of Node.js and npm installed on your system. See additional requirements.
-
Run
npm init @shopify/app@latestThis prompts you for an app name, asks whether you want to use Remix (recommended), and asks whether to use JavaScript or TypeScript. A folder is created with the name you provide, and the app is initialized in that folder. If you choose not to use Remix, you will need additional environment setup discussed later in the tutorial.
The final output should show you that the process succeeded:
╭─ success ──────────────────────────────────────────────────────────────╮ │ │ │ render-sample-app is ready for you to build! │ │ │ │ Next steps │ │ • Run `cd render-sample-app` │ │ • For extensions, run `npm run generate extension` │ │ • To see your app, run `npm run dev` │ │ │ │ Reference │ │ • Shopify docs │ │ • For an overview of commands, run `npm run shopify app -- --help` │ │ │ ╰────────────────────────────────────────────────────────────────────────╯ -
Change into the new project folder, and run
npm run devto continue building the app. (If you’re building an extension, usenpm run generate extensioninstead.)This command creates a local SQLite database, along with its database migration schema.
The command also prompts you to associate the project with a registered Shopify app and creates a “development store” that you will need later on. You can choose to either create a new app or associate the project with an existing app (Shopify displays a list of your existing apps). This step may require authentication to Shopify.
Pay close attention to the terminal output as you go through these steps. It provides helpful information about accessing your application, resetting your database, and more.
╭─ info ─────────────────────────────────────────────────────────────────────╮
│                                                                            │
│  Using shopify.app.toml:                                                   │
│                                                                            │
│    • Org:             Render Sample App                                    │
│    • App:             render-test-walkthrough                              │
│    • Dev store:       render-example-app.myshopify.com                     │
│    • Update URLs:     Not yet configured                                   │
│                                                                            │
│   You can pass `--reset` to your command to reset your app configuration.  │
│                                                                            │
╰────────────────────────────────────────────────────────────────────────────╯
Note the value of your
Dev storefor use in a later step. -
Once the app is running in development mode, press
pin the terminal prompt to open the app in your browser, and install it to your test store. If this succeeds, you can pressqto quit the development mode runtime and continue.Your Shopify app uses a local SQLite database by default. On Render, locally stored files are lost with each deploy of your service. We strongly recommend that you configure your app to use PostgreSQL instead. Learn how to set up PostgreSQL on Render, and see the Shopify CLI docs for more information on connecting to a dedicated database.
-
Fetch your Shopify API details and scopes using
npm run shopify app env show.This outputs a few lines of text showing you your
SHOPIFY_API_KEY,SHOPIFY_API_SECRET, andSCOPESvariables. You’ll need to add these values to your Render service for it to connect to Shopify successfully.
Prepare your Render deployment
-
Commit your code and push it to a repository on GitHub/GitLab/Bitbucket. You’ll connect this repo to your Render service.
-
In the Render Dashboard, click New > Web Service.
-
In the service creation flow, connect your project’s Git repository and give the service a name such as
shopify-example-app- Render assigns your web service an
onrender.comsubdomain based on its name (e.g., a name of “Shopify Example App” might producehttps://shopify-example-app.onrender.com). You will need this URL later.
- Render assigns your web service an
-
Select Docker as your service’s runtime and choose an instance type (such as Free or Starter).
-
Add the following environment settings to your service:
Variable Name Value SHOPIFY_API_KEYObtain by running npm run shopify app env showSHOPIFY_API_SECRETObtain by running npm run shopify app env showSCOPESObtain by running npm run shopify app env showSHOPIFY_APP_URLUse the Render web service’s URL from above (e.g., https://shopify-example-app.onrender.com) for Remix-based applicationsHOSTSet to the same fully-qualified domain name (FQDN) as the SHOPIFY_APP_URLabove, but only for non-Remix based applicationsNODE_ENVSet this to production. -
Click Create Web Service.
Render kicks off your service’s first deploy.
You’re all done on the Render side! Your Docker container successfully deploys on Render within a few minutes. From your service’s page in the Render Dashboard, click its onrender.com URL to view the running app. As you continue to build, you can push updates to your GitHub/GitLab/Bitbucket repository, and Render will automatically redeploy your service with the updated code.
Note your app’s URL (such as https://shopify-example-app.onrender.com/), because you’ll need it to configure your Shopify app below.
Finish configuration in Shopify
There are two proposed ways of finishing your Shopify application setup which includes setting up callback URLs. The first method described below will modify a configuration file and deploy using the Shopify CLI. The second method will be done directly in the Shopify developer portal.
Method 1: Local configuration and deployment using Shopify CLI
When you created the Shopify application using the Shopify CLI tool, a configuration file named shopify.app.toml was created in your project’s root directory. This file contains the necessary URL configurations to change.
-
Look for the line that contains
application_urland change it to your Render service’sonrender.comURL. For example, if your service’s URL ishttps://shopify-example-app.onrender.com, the line should look like this:application_url = "https://shopify-example-app.onrender.com" -
Next, under the
[auth]section in the configuration file, find theredirect_urlslist and change the callback URLs to match your Render service’s URL. For example:redirect_urls = [ "https://shopify-example-app.onrender.com/auth/callback", "https://shopify-example-app.onrender.com/auth/shopify/callback", "https://shopify-example-app.onrender.com/api/auth/callback" ] -
Save the file and run
shopify app deployto deploy your app to Shopify. You should see a confirmation that shows the changes in theapplication_urlandauthsections. Confirm the changes.╭─ info ───────────────────────────────────────────────────────────────────────────────────────────────╮ │ │ │ Using shopify.app.toml: │ │ │ │ • Org: Render Example │ │ • App: shopify-example-app │ │ • Include config: Yes │ │ │ │ You can pass `--reset` to your command to reset your app configuration. │ │ │ ╰──────────────────────────────────────────────────────────────────────────────────────────────────────╯ ? Release a new version of render-test? ┃ Configuration: ┃ • application_url (updated) ┃ • auth (updated) ┃ • name ┃ • handle ┃ • access_scopes ┃ • webhooks ┃ • pos ┃ • embedded ┃ ┃ Extensions: ┃ None (y) Yes, release this new version (n) No, cancel
You can confirm these changes were applied by logging into the Shopify developer portal, selecting your app, selecting the latest version, and checking the URLs displayed on the screen.
Method 2: Direct configuration in Shopify developer portal
If you’re more comfortable making these changes directly in the Shopify developer portal, you can do so instead.
Log in to your Shopify developer portal and open your partner account page (it has a URL like https://partners.shopify.com/12345). You’ll perform a few different actions here to finish setting up your app.
Add callbacks to your Shopify app
From your partner account page, click Apps in the left menu and select the app you created with the Shopify CLI.
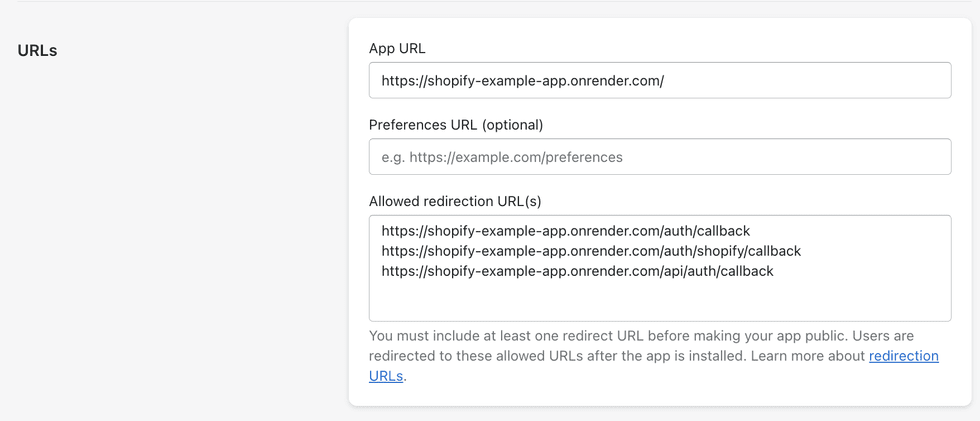
Click Configuration in the left menu and find the URLs section.
In this section, do the following:
-
Provide your Render service’s
onrender.comURL in the App URL field. -
In the Allowed redirection URL(s) field, add three entries that each start with your Render service’s
onrender.comURL and end with the following paths:/auth/callback(eg,https://shopify-example-app.onrender.com/auth/callback)/auth/shopify/callback/api/auth/callback
When you’re done, the URLs section should look like this:
-
Click Save and release at the top of the page.

Configure your development store
If you have already followed the step-by-step instructions above, you will have already created a development store and installed your app within that store and do not need any further configuration.
If you have not already installed your app on a development store, or if you want to install your application on a different development store, you will need to follow the steps below.
First, we need to choose and configure a store to use your deployed Render application.
-
From your partner account page, click Stores in the left menu and choose one of your stores.
-
Verify whether your app has already been installed in your store.
-
Click Apps in the left menu and select the app you created with the Shopify CLI.
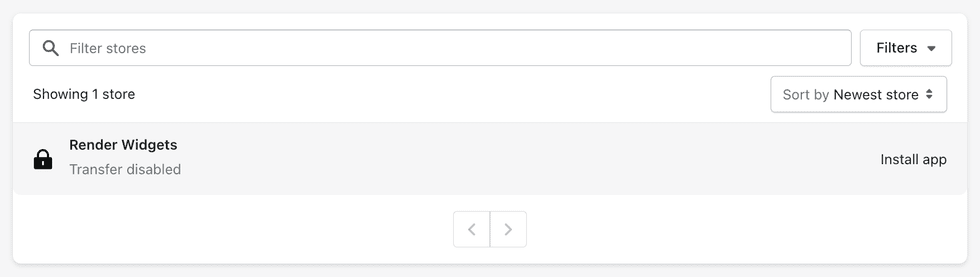
-
You’ll see a panel that says Test your app. Click Select store, hover over your development store, and click Install app.
-
You may be prompted to verify some settings. Click Install to continue.
-
You’re redirected to the store’s admin page, which displays the following:
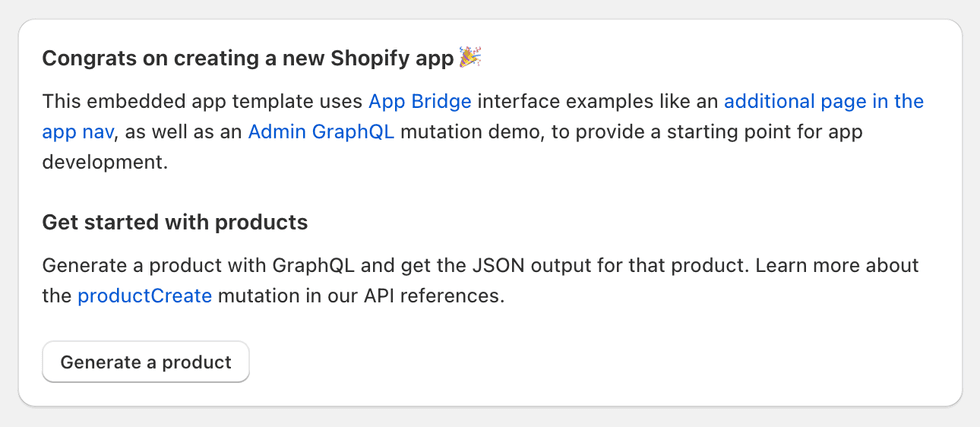
This indicates that your app is working as expected.


If your Render service is running on the Free instance type, it might take up to a minute to spin back up if it hasn’t received traffic for a while. You can visit your service’s onrender.com URL to spin it up before opening your admin page.