Workspaces, Members, and Roles
Create your workspace, add collaborators, and manage access.
Everything you create on Render (services, datastores, and so on) belongs to a workspace. Every workspace has an associated plan that determines available features and how many team members you can invite.
When you sign up for Render, we automatically create your first workspace on the free Hobby plan. You can create additional workspaces or change a workspace’s plan at any time.
Create a workspace
You can have up to five Hobby workspaces.
You can create an unlimited number of paid workspaces.
-
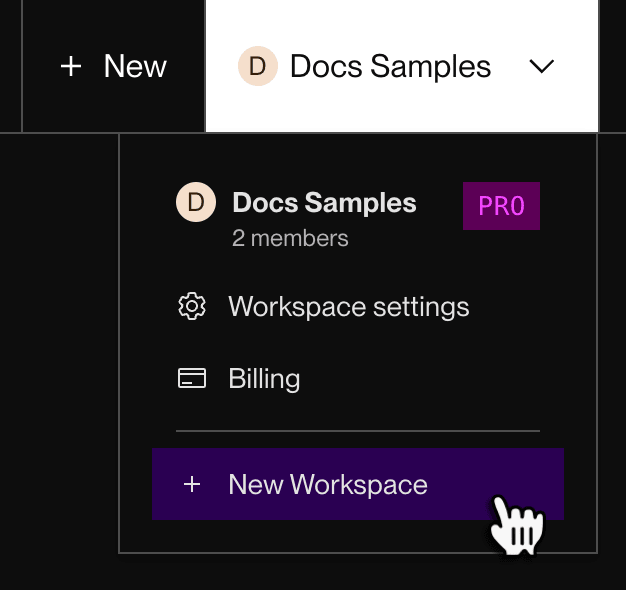
In the Render Dashboard, open the workspace menu in the top-right corner, then click + New Workspace:
-
Complete the workspace creation flow, including specifying a plan type and payment method. Then click Create Workspace.

You’re all set! Render creates your workspace and assigns you the Admin role. You can switch to your new workspace from the dropdown:

Now you can start creating services and other resources in your workspace. With a Professional workspace or higher, you can also invite team members.
Change a workspace’s plan
You can change your workspace’s plan in the Render Dashboard:
- Open the workspace menu in the top-right corner and select Billing.
- Under the Plan section, click Update Plan.
- Click the Choose button for your desired plan.
- To switch to an Enterprise plan, instead please contact sales.
- Review the details of your plan change, including any reduction in available features if you’re downgrading.
- Click Confirm.
Your plan change takes effect immediately. You can view your workspace’s current plan from the Billing page at any time.
Manage team members
You can’t add team members to a Hobby workspace.
First, upgrade your workspace to Professional or higher.
Team members with the Admin role can manage other team members (including other admins):
-
From your workspace page in the Render Dashboard, click the workspace menu in the top-right corner, then click Workspace Settings.
-
Scroll down to the Team members section.
- To add a team member, click + Invite members. Newly added members are assigned the Developer role.
- To remove a team member, open the ••• menu next to that member and click Remove team member.
- To change a team member’s role, click their current role and select a new one.
Member roles
Each member of a workspace has one of the following roles:
| Role | Description |
|---|---|
|
Admin |
Has full access to the workspace’s resources and organizational settings (such as member management, billing management, and secure login enforcement). Can also designate individual project environments as protected. A workspace’s creator is automatically assigned this role. |
|
Developer |
Has access to the workspace’s resources (services, environment groups, and so on). Access is limited for resources in a protected project environment. Does not have access to organizational settings. Newly added members besides a workspace’s creator are automatically assigned this role. |
Admins can reassign member roles from the Workspace Settings page in the Render Dashboard.
Role permissions
🟢 Permitted
❌ Not permitted
🟨 Permitted with restrictions (details vary by permission)
Workspace administration
| Permission | Admin | Developer |
|---|---|---|
| Edit workspace settings | 🟢 | ❌ |
| Add/remove workspace members | 🟢 | ❌ |
| View workspace members | 🟢 | 🟢 |
| View billing details | 🟢 | 🟢 |
| Edit payment method | 🟢 | ❌ |
Projects and environments
| Permission | Admin | Developer |
|---|---|---|
| Create/modify projects | 🟢 | 🟢 |
| Delete projects | 🟢 |
🟨 Can’t delete a project with at least one protected environment. |
| Create environments | 🟢 | 🟢 |
| Modify/delete environments | 🟢 |
🟨 Non-protected environments only. |
|
Designate an environment as protected or network-isolated | 🟢 | ❌ |
| Move resources into or out of an environment | 🟢 |
🟨 Non-protected environments only. |
Services and datastores
| Permission | Admin | Developer |
|---|---|---|
| Create services | 🟢 | 🟢 |
| Modify/delete services | 🟢 |
🟨 Can’t perform potentially destructive actions (including deletion) on services in a protected environment. |
| View connection strings and credentials for datastores | 🟢 |
🟨 Non-protected environments only. |
| Modify access control IPs for datastores | 🟢 |
🟨 Non-protected environments only. |
| Access the shell for a service | 🟢 |
🟨 Non-protected environments only. |